Most people who go gluten-free assume sourdough is gone for good. It is one of the first things I hear in my inbox: someone read that fermentation breaks down gluten, tried a slice of wheat sourdough at a bakery, and spent the next two days regretting it. So let me clear that up before we bake anything. Traditional wheat, rye, or barley sourdough is not safe for celiac disease. Fermentation chews through some of the gluten, which is why sourdough is gentler on a lot of stomachs, but it leaves far more than the 20 parts per million the law allows for a gluten-free label. I cover exactly why in my breakdown of whether sourdough bread is gluten free.
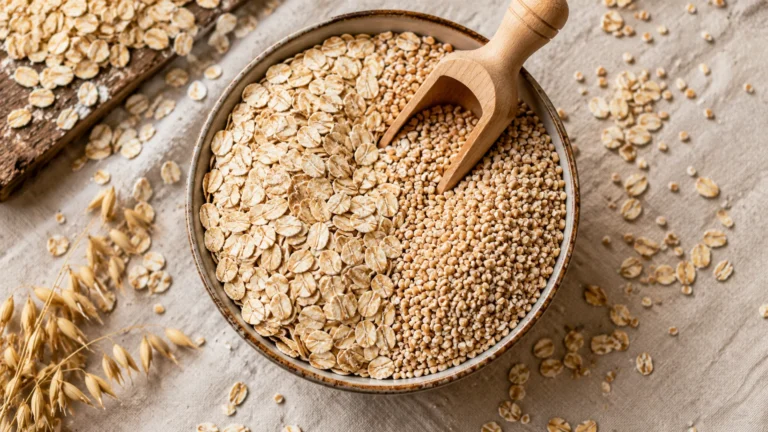
The good news is the part nobody tells you. You can build a sourdough starter and bake a genuinely sour, chewy, crusty loaf using only naturally gluten-free flours like brown rice, sorghum, and buckwheat. It will not behave like wheat dough, and that is the single biggest reason home bakers fail. This guide walks through the whole thing the way I wish someone had explained it to me: the starter, the flours, the one binder that changes everything, the proofing, and the troubleshooting for when your first loaf comes out like a hockey puck. By the end you will know not just the steps but why each one matters, which is what lets you adjust when your kitchen, your flour, or your starter throws you a curveball.
Why gluten-free sourdough is its own craft
Wheat sourdough rises because gluten forms an elastic web that traps the carbon dioxide your wild yeast produces. Gluten-free flours have no gluten, so there is no web. Left alone, the gas just escapes and you get a flat, sandy brick. Everything we do in gluten-free sourdough is about building a different kind of structure to do the job gluten normally does for free.
That structure comes from two places. First, the starch and protein in your flour blend, which sets when it bakes. Second, a hydrocolloid binder, almost always psyllium husk, which forms a gel that holds gas bubbles in place during the proof and the early minutes of baking. Get the binder right and a gluten-free dough actually becomes shapeable, scoreable, and capable of real oven spring. Skip it or measure it wrong and no amount of good starter will save the loaf. This is the piece the recipe-card sites tend to gloss over, and it is the difference between a loaf you are proud of and one you toast to hide.
The second mental shift is hydration. Gluten-free flours, especially psyllium and the rice-sorghum family, drink far more water than wheat. A wheat dough at 70 percent hydration is workable; a gluten-free dough often needs 90 percent or more just to look like dough rather than crumbs. That high water content is also why patience at the cooling stage is non-negotiable, which I will come back to.
Building a gluten-free sourdough starter from scratch
A starter is just a living culture of wild yeast and lactic acid bacteria that you keep alive with regular feedings of flour and water. You can build one from gluten-free flour in about seven to ten days. I use brown rice flour because it is reliable and cheap, though sorghum and buckwheat both work and buckwheat tends to get going fastest.
Day one: stir 50 grams of brown rice flour into 50 grams of filtered water in a clean jar, cover loosely, and leave it on the counter. Each day after that, discard about half and feed it another 50 grams of flour and 50 grams of water. You are looking for bubbles, a tangy smell, and eventually a reliable rise where the starter doubles within four to six hours of feeding. Use bottled or filtered water if your tap water is heavily chlorinated, because chlorine can slow the culture down.
A few things matter more than people expect. Keep it warm; wild yeast is sluggish below about 70 F (21 C), and a cold kitchen can stall a young starter for days. Feed by weight with a kitchen scale, not by cups, because gluten-free flours pack differently and a cup of rice flour one day is not a cup the next. And be patient through the false start around day three or four, when a burst of early bacteria dies off and the jar goes quiet. That lull is normal. Keep feeding and the real yeast takes over. A starter is mature enough to bake with once it doubles predictably and smells pleasantly sour rather than sharp or like acetone.
Choosing your gluten-free flour blend

This is where loaves are won or lost. A single gluten-free flour almost never makes good bread on its own; you blend for flavor, structure, and moisture. You can buy a quality all-purpose blend, and if you want to understand what goes into a good one, I broke down the ratios in my guide to building the ultimate gluten-free flour blend. For sourdough specifically, here is the framework I use, built around a neutral base, a tender body flour, and starches for stretch.
A reliable starting point is roughly half brown rice flour, a quarter sorghum, and the rest split between tapioca and potato starch, with an optional handful of buckwheat for that deeper sourdough tang. If you prefer to buy rather than blend, choose a bag that already includes rice flour and starches and that does not already contain xanthan gum, since you will be adding psyllium yourself and stacking binders leads to gumminess. Whatever you choose, weigh it. Volume measurements are the number one hidden cause of inconsistent gluten-free loaves.
Psyllium versus xanthan: the binder that decides everything
If you remember one thing from this guide, make it this. For a sliceable, chewy artisan loaf, psyllium husk is the binder, not xanthan gum. Xanthan is excellent in cakey things like muffins and cookies, but in bread it gives little oven spring and turns gummy when you push the dose up. Psyllium forms a strong, stretchy gel that mimics the gas-trapping job of gluten, which is exactly what a hearth loaf needs.
Whole husk and powder are not interchangeable spoon for spoon. The powder is more concentrated, so if a recipe calls for whole husk and you only have powder, use roughly 20 percent less and measure by weight to be safe. Mix your psyllium into the water and let it sit for a minute or two to form a gel before you combine wet and dry; this prevents dry pockets and gives the dough that workable, slightly tacky feel. One harmless quirk to expect: psyllium can tint the crumb a faint gray or purple. It is purely cosmetic and disappears under a good crust and a smear of butter.
How to make gluten-free sourdough bread, step by step
Here is the method, assuming a mature, recently fed starter and the blend above. The dough is more like a thick, scoopable batter than a kneadable ball, so do not panic when it does not knead.
- Make the psyllium gel. Whisk 25 grams of whole psyllium husk into about 350 grams of warm water and let it sit two minutes until it thickens.
- Combine. Mix 400 grams of your flour blend with 8 grams of salt. Add 150 grams of active starter and the psyllium gel. Stir with a sturdy spoon or dough whisk until no dry flour remains. It should be thick, sticky, and hold a soft shape.
- Rest. Cover and rest 30 minutes. This lets the flours fully hydrate and the gel firm up so the dough becomes shapeable.
- Shape. Wet your hands, scoop the dough onto a sheet of parchment, and smooth it into a round or oval with damp hands or a wet spatula. You are shaping, not kneading.
- Bulk proof. Cover and let it rise at room temperature until it grows 40 to 60 percent and looks domed and airy, usually three to six hours depending on your kitchen and starter strength.
- Optional cold proof. For more sour flavor and cleaner scoring, refrigerate the shaped loaf 8 to 12 hours. This step is where a lot of the bakery-style tang comes from.
- Score and bake. Preheat a Dutch oven to 450 F (232 C). Score the top, lower the loaf in on its parchment, cover, and bake 45 minutes. Uncover and bake another 15 to 20 minutes until deep golden.
- Cool, and actually wait. Cool on a rack until completely room temperature, at least two to three hours. Cutting early is the single most common way home bakers ruin an otherwise perfect loaf.
A realistic same-day-plus-overnight schedule
Timing trips people up more than technique, so here is a schedule you can actually plan a day around. Treat the times as a rhythm, not a rule; a strong starter in a warm kitchen will move faster.
The science of proofing gluten-free dough

Proofing is where wheat instincts fail you. With wheat, you poke the dough and watch it spring back. Gluten-free dough does not spring back the same way, so go by volume and look instead. You want a visible rise of roughly half again its starting size and a domed, slightly puffy surface. Because there is no gluten to overstretch, gluten-free dough is somewhat more forgiving of a long proof than wheat, but it can still overproof: push it too far and the structure collapses into a flat, spreading mass when it hits the oven.
Temperature is your main lever. The wild yeast and bacteria in your starter are most active in a warm spot, so a rise that takes three hours in a 78 F (26 C) kitchen can take six or more in a cold one. If your house runs cool, proof inside an oven with just the light on, or near a warm appliance. The cold proof in the fridge does something different: it slows the yeast while the acid-producing bacteria keep working, which builds the deeper sour flavor that defines a good sourdough. If you want more tang, lengthen the cold proof, not the room-temperature one.
Storage and keeping the crumb fresh
Gluten-free bread stales faster than wheat bread because those starches retrograde quickly, but a sourdough loaf holds up better than most thanks to its acidity and high hydration. Keep it cut-side down on a board or in a paper bag for the first day or two at room temperature; do not refrigerate it, since the fridge is the fastest way to dry and stale any bread. For longer storage, slice the fully cooled loaf, freeze the slices flat in a bag, and toast them straight from frozen. That toaster step is not a workaround for a bad loaf; even excellent gluten-free sourdough is at its best lightly toasted after day one, and freezing locks in the fresh-baked texture far better than the counter ever will.
Troubleshooting common failures
Almost every gluten-free sourdough problem traces back to one of a handful of causes: the starter, the hydration, the proof, the binder, or cutting too soon. Use this as your diagnostic chart.
When something goes wrong, change one variable at a time and write it down. Gluten-free baking rewards record-keeping more than instinct, because your flour brand, your starter, and your kitchen temperature all shift the outcome. Two or three controlled bakes will teach you your own setup better than a dozen recipes ever could.
What to do with your gluten-free sourdough
Once you have a loaf you trust, it earns its place at the table. A thick, chewy slice is built for dunking, which is why I almost always bake a loaf when there is a pot of something simmering; it is the natural partner for a bowl of creamy soups. If you have leaned into alternative-flour baking and want to keep that momentum, the same comfort with rice, sorghum, and nut flours translates directly into low-carb work, and there is a deep well of ideas in the world of keto baking that uses many of the same binders and techniques. And if you are still building out your gluten-free bread skills more broadly, my full gluten-free bread collection has the sandwich loaves, quick breads, and rolls to round out the basket.
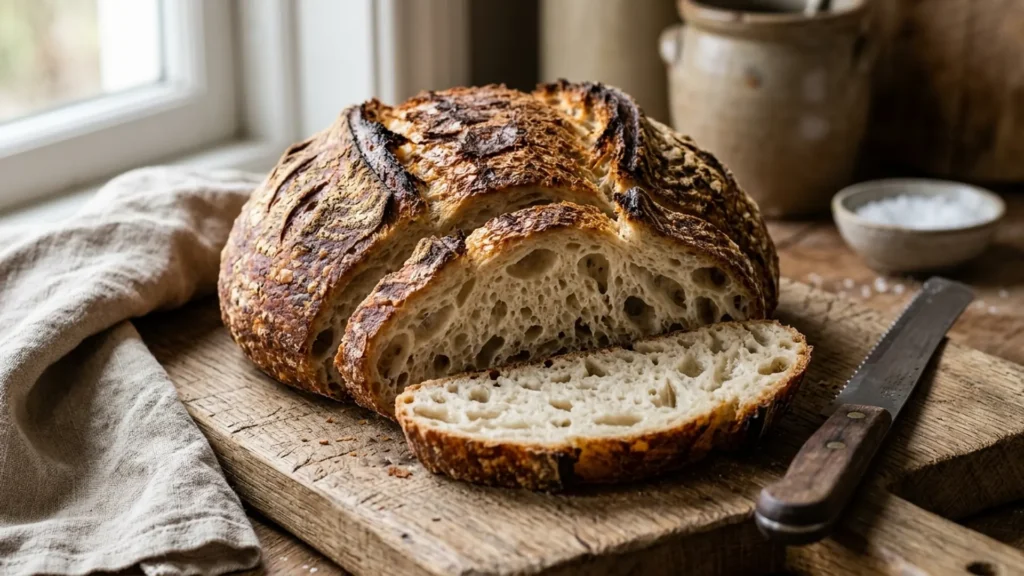
Sourdough is the loaf that finally convinces people gluten-free baking can be genuinely good rather than a sad substitute. It takes a little more attention than a quick bread, but the payoff is a crust that crackles, a crumb that pulls, and a tang that tastes like real bread. Weigh your ingredients, respect the psyllium, trust the cooling step, and you will get there.
Frequently Asked Questions
Is sourdough bread gluten free?
Traditional sourdough made from wheat, rye, or barley is not gluten free and is not safe for celiac disease. Fermentation reduces some gluten but leaves far more than the 20 parts per million the law requires for a gluten-free label, a threshold drawn from the gluten-free diet standards. Only sourdough made entirely from gluten-free flours, such as brown rice, sorghum, or buckwheat, is genuinely gluten free.
Do I really need psyllium husk?
For a sliceable, chewy artisan loaf, yes. Psyllium forms the gel that traps gas and gives the bread structure and oven spring that gluten-free flours cannot provide on their own. Xanthan gum works in cakey quick breads but produces a denser, gummier result in a true sourdough loaf.
Why is my gluten-free sourdough gummy in the middle?
The two usual culprits are slicing while the loaf is still warm and underbaking. Bake to an internal temperature of 207 to 210 F (97 to 99 C) and let the loaf cool completely, at least two to three hours, before you cut it. The crumb finishes setting as it cools.
How long does it take to make gluten-free sourdough from scratch?
Building a starter takes about seven to ten days of daily feeding. Once the starter is mature, a loaf takes most of a day: roughly 30 minutes to mix and shape, three to six hours to bulk proof, an optional 8 to 12 hour cold proof for more tang, about an hour to bake, and two to three hours to cool.